Steam bending is a wonderful, almost magical, way to make curved parts. In a matter of hours I can transform what looks like a completely unbendable rough board more than 2″ thick into a beautifully curved chair leg ready for final shaping. The process uses material efficiently, especially compared to cutting out the same shape from a flat board. And, if I have been careful about orienting the long grain parallel to the sides of the blank, the grain will wrap around the bend making for a very strong leg with little or no run out. Although there are occasional bending failures (some wood just won’t bend even if it is a species that normally bends well), a careful and methodical process can yield very predictable results.
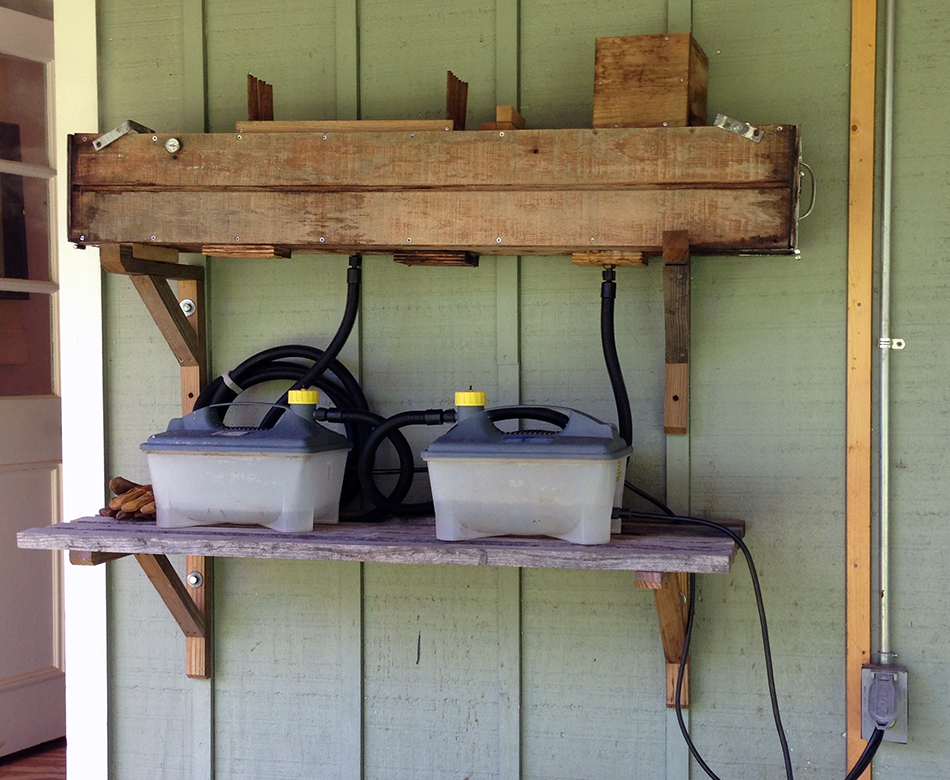
As described in previous posts, here, here, and here, steam bending really begins with careful wood selection and preparation. Once that is complete I am ready to bend. Here is a photo of my dedicated steam bending set up on the front porch of my shop. I like having it outside so I don’t have to deal with the effects of lots of steam inside the shop. It is also under cover so I can comfortably bend in all weather. The box is not insulated, but even in cold weather, once it reaches maximum temperature it stays there for the entire steam time.
Generating steam
I use two steamers made by Earlex. Rockler also sells a steamer that I believe is identical, except that it comes with some additional hardware for building a steam box. As far as I know these are essentially wallpaper steamers sold as steam generators for wood bending, hence the very long hose. They do come with fittings that allow for easy connections between the hose, steamer and box. Of course anything that will generate a large volume of steam will work, such as a large pot heated by propane. I prefer these electric steamers since I can simply plug them in and I never run out of fuel.
I’m not really clear about the science behind it, but as I understand it, large volumes of steam moving through the box do a really good job of transmitting heat to the part. It is the heat, not the moisture, that makes the wood fibers pliable enough to bend. For a box this size I find that two steamers work very well, producing a very large volume of steam. If you want to use one steamer, I would consider reducing the dimensions of the box. For instance this box can hold 4 rear legs, so you could reduce the height of the box by half and still be able to hold 2 rear legs. I can’t say for sure this will work since I have never tried it, but that’s where I would start.
Each steamer uses 1500 watts of electricity and requires it’s own 15 amp circuit. The outlet I installed, lower right, is actually 2 separate 15 amp circuits, one for each steamer.
Steam Box
- 48″ long by 6″ wide x 6″ tall, interior dimensions, made from exterior plywood. This box can hold 4 rear legs or 6 slats.
- The long sides are caulked and air tight. The two doors are not air tight and allow steam to escape. This is extremely important since an air tight box would explode with the pressure created by the steam. Additionally the movement of steam through the box seems to help transmit more heat to the parts.
- The left side of the box is slightly elevated to encourage drainage through a small hole on the bottom, right side of the box.
- I put a small thermometer towards the top on the left side of the box. When the temperature reaches 200° I begin counting the steam time. I’m not sure if 200° is the actual temperature inside the box, but it is the maximum this thermometer registers under these conditions. Other thermometers may register a different maximum temperature, so wait until the temperature stops rising before beginning to count the steam time.
- For longer parts (the rocker legs are almost 50″ long) I open the door on the right and extend the length of the main steam box by sliding a smaller box in the open end. You can see this box sitting on top of the steam box towards the right. If I were building the steam box over again I would simply make it a little longer.
Bending Form
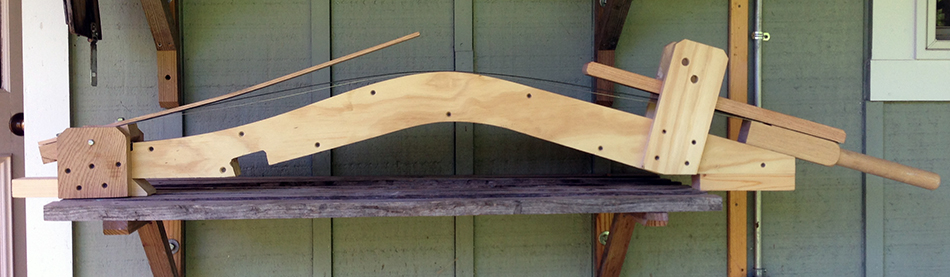
The other essential element in steam bending is, of course, the bending form, pictured below. This form is designed as both a bending form and a drying form. The main bend in the center of the form actually applies an overbend to the leg, which is held in the overbent position for several hours. After that the leg is allowed to rise to it’s final position to dry. The purpose of overbending is to minimize spring back as the leg dries to it’s final shape. A long metal pipe can be slipped over the handle on the right should I need additional leverage when bending. The distance between the top swivel stop on the left and the bottom stop in the handle on the right matches the length of the leg blank.
Pictured below is the end of the form that captures the top of the leg. This stop swivels to make it easier to insert the straight blank into the form. Below the top stop is a french cleat for hanging the form. Attached to the swivel stop by 2 bolts is the 2″ wide bending strap. Above the strap is a thin piece of oak which protects the leg when clamping it to the form. And, below the bending strap is a 2″ wide piece of thin stainless steel which keeps the leg from contacting the steel bending strap, thus minimizing or eliminating any staining. The cutout on the bottom of the form is for clamping.
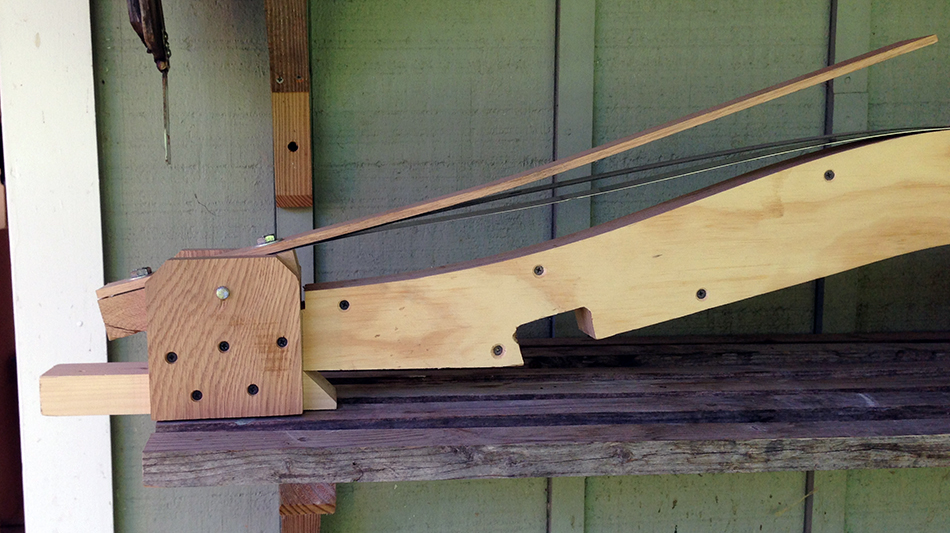
And here is the end of the form that captures the bottom of the leg. The gusset has two locations for pins. Initially a pin is put in the lower location to hold the leg in an overbent position. After several hours the pin is moved to the upper location allowing the leg to gradually rise to it’s final shape while drying. The bending strap is bolted between the two parts of the handle assembly. If you look closely you’ll see a small notch cut out of the left side of the lower handle. The stainless steel slips into this notch but is not bolted to it. This keeps all of the bending pressure on the bending strap itself which is designed to handle it, and doesn’t stretch out the stainless steel which is allowed to move freely in the notch.

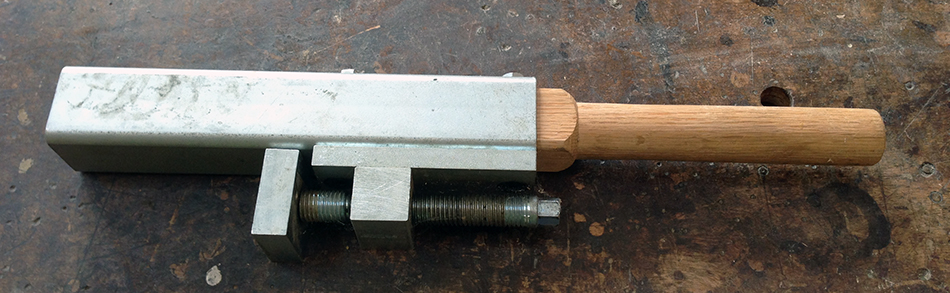
An alternative to the wooden handle assembly pictured above is this strap clamp, shown below. The benefit of the strap clamp is that it opens up to easily fit over the blank then tightens to a very sung fit between it and the swivel stop at the top of the leg. The wood fibers at the top of the bend will want to expand while being bent. A very snug fit between stops allows the bending strap to put lots of downward pressure on the blank, keeping the fibers at the top of the bend from expanding and breaking. The strap clamp is capable of applying more pressure on the bending strap compared to the wooden handle assembly so if you are having problems with the blank breaking at the top of the bend using a strap clamp may help. The only downside is that it is a good deal more expensive than the wooden handles. In the side chair class that I teach, and in the forms that I help my students build, I always use the wooden handle assembly since it is less expensive and generally works very well.
Sources
- Earlex Steam Generator: Woodcraft, Highland Woodworking and many others
- Rockler Steam Bending Kit
- 2″ Bending Strap: a 10ʹ length is enough for two bending forms. Lee Valley
- 2″ Strap Clamp: includes 10ʹ of bending strap. Lee Valley
- Stainless Steel: 304 Stainless Steel 2B Finish, 26 Gauge (.0178"), 2″ x 54″. Stainless Supply
Side Chair Build Series Links:
- Next Post: Steam Bending, Part 2 — Bending the Rear Legs
- Previous Post: Preparing the Rear Legs for Bending