I’d like to begin the discussion on slat mortising by describing how to layout the mortises on the rear leg. I can do the layout directly on a leg if I am planning on chopping the mortises by hand. Or I can use the same principles to layout a template to cut the mortises with a router—I will be describing how to build and use a router jig to cut the slat mortises in subsequent posts.
A tale of two chairs
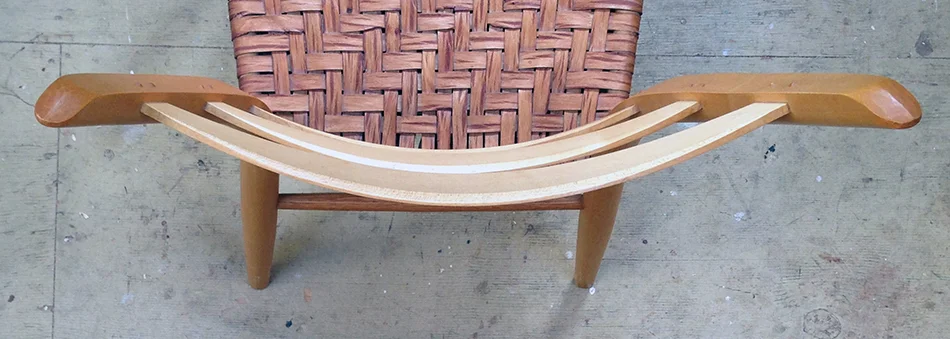
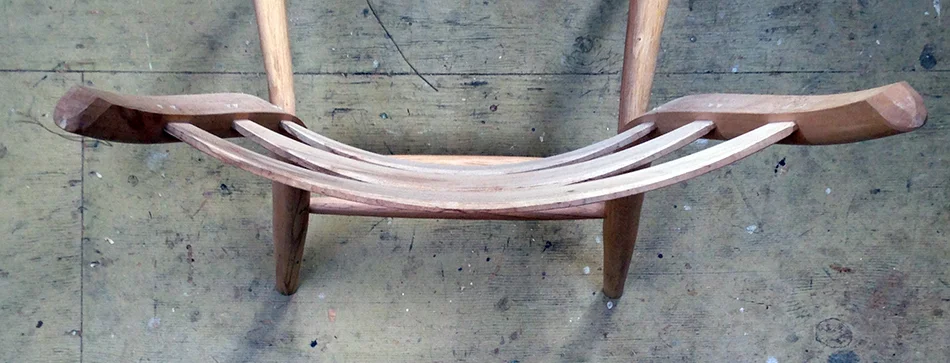
One of things that makes this chair so comfortable is the alignment of the slats. The top photo is a chair I made in a 2008 class with Brian, and the bottom chair is one I built last year. Look very closely at the slats in these photos. In the top photo as you sight down the center of the slats the center section of the lower slat disappears completely, which means that the top of that slat tilts forward and is not in alignment with the middle and upper slats. It’s a little hard to see, but in the bottom photo as you sight down the center of the slats you can see all three slats in a single continuous plane. This continuous plane provides the best lumbar support for your back.
Here is another view of the two chairs that demonstrates the difference more clearly. I’ve simply clamped a thin strip of wood to the bottom slat. In the chair on the left you can see that the plane of the bottom slat does not align with the plane of the middle and upper slats. In the chair on the right the three slats are in very nice alignment.
So why is the alignment better in the chair on the right and what causes the difference? In 2009 Brian taught the same side chair class again and a friend of mine took it for a second time. He mentioned to me after that class that Brian taught them an improved method of laying out the slat mortises that resulted in better alignment of the slats. In brief, the slat mortises are laid out 1/4″ from the edge of the rear leg. In the chair on the left the mortises are laid out based on the height of the tenons. In the chair on the right the position of the lower mortise is altered by laying it out based on the height of the slat at it’s widest point in the center. This probably doesn’t make much sense, so bear with me as I explain the two methods and their results in the following illustrations.
First, locate the mortises
Both methods begin by marking the mortise locations on the leg. Remember that the top of the rear legs have a flat side and a tapered side. The slat mortises are cut into the tapered side so all layout must be done on the tapered side. Start by hooking the story stick over the bottom of the leg and marking the position of the bottom of the lower slat mortise. This will locate the bottom of the lower slat roughly 6-1/2″ above the seat which puts the slat in a good position to provide lumbar support for the back which begins at about 7″ above the seat. Next rotate the story stick and mark the position of each slat mortise as shown in the bottom half of the illustration.
Next, layout the mortises
The original method for laying out the slat mortises involves marking 1/4″ from the edge at the bottom and top of each mortise. Using this method each mortise will be 1/4″ away from and as parallel as possible to the edge of the leg, even on parts of the leg that are curved. The downside is that the lower slat mortise does not align with the middle slat mortise as shown in the top half of the illustration. The solution in the improved method is to layout the lower mortise based on the full height of the slat which is 3-1/2″. This has the effect of rotating the mortise so that it is no longer parallel with the edge of the leg, but is in better alignment with the middle mortise as shown in the bottom half of the illustration. For this chair it is only necessary to adjust the position of the lower mortise because it is located on a part of the leg with a distinct curve. The middle and upper mortises are on a relatively flat part of the leg so they align with each other fairly well. Or, if you’re a real stickler, you can layout each mortise based on the height of it’s slat.
I really love the subtlety, finesse and elegance of this solution. It is not an obvious thing to do which makes it even more impressive. It’s one of the many fine points that come together to make this such a beautiful and comfortable chair. We are the lucky beneficiaries of Brian’s 30 years of chairmaking experience.
In the next post I will apply these principles to laying out a template and building a jig for cutting the slat mortises with a router.
Side Chair Build Series Links:
- Next Post: Slat Mortising Part 2 — Building a Slat Mortising Jig
- Previous Post: Chair Design, Part 1


