In the last post I showed how to measure for drilling angles using an existing chair. The drilling method, rise and run, relies on using the trapezoid formed by the rungs and legs and rotating it until the rung mortise to be drilled is 90° to the table top. However, if you do not have a chair to measure or if you are designing a new chair you will need draw a trapezoid on paper and take your measurements from it.
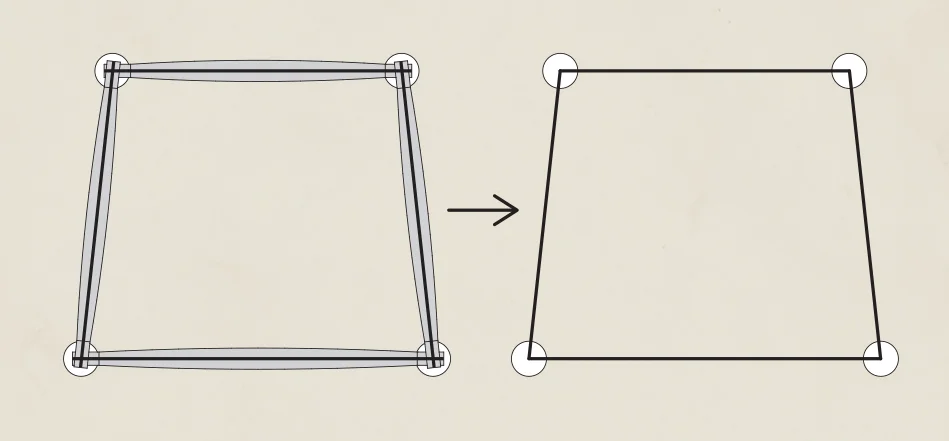
Start off with these known dimensions—rung lengths, tenon length, and leg diameter—and use those to draw an accurate trapezoid. The illustration on the left shows a cross section of a chair with the rung tenons visible. Notice that the tenons project past the center of the leg. For accuracy eliminate the distance each tenon projects past center to arrive at a center-to-center measurement for each side of the trapezoid. Then draw a trapezoid with those center-to-center measurements as shown in the illustration on the right.
Begin by subtracting the distance that both tenons project past the center of each leg from the length of the rung. For example, if the leg diameter is 1-3/4″ then the center of the leg is 7/8″ from its edge. If the mortise depth is 1 1/4" then the rung tenon will project past center by 3/8″ (1-1/4″ – 7/8″ = 3/8″). Multiply 3/8″ by 2 (for each end of the rung) and subtract this amount from the rung length to arrive at the length for the side of the trapezoid.
So, using our example, in chairs with a leg diameter of 1-3/4″ and mortise depth of 1-1/4″ the formula reads like this:
Rung length – 3/4″ = length of trapezoid side
Repeat this calculation for the front, sides, and rear faces of the trapezoid. Then draw an accurate trapezoid and use it to measure for the drilling angles. Start by raising and rotating the corner of the trapezoid that represents one front leg until the opposite side of the trapezoid is parallel to a framing square as shown below. Measure the distance the raised corner is above the table top. In this example the corner is 1-13/16″ above the table top. This is the height the front panel is raised when drilling for the side rung mortises in the front legs.
Flip the trapezoid over to measure for the rear panel. Raise and rotate the corner of the trapezoid that represents one rear leg until that side of the trapezoid is parallel to a framing square as shown below. Then measure the distance the raised corner is above the table top. In this example the corner is 1-1/2″ above the table top. This is the height the rear panel is raised when drilling for the side rung mortises in the rear legs.
Here is the cross section view of the final drilling jig. For chairs with no splay in the legs this single jig can be used to drill all the side rung mortises in both the front and rear panels.
To use the jig clamp it in place on the drill press so that the center of the drill bit is set half a leg’s diameter from the fence. Mark the location of the side rung mortises on the front and rear panels then simply place them on the jig and drill the side mortises. The beauty of this jig is that it is impossible to drill the mortises at the wrong angle—each panel will only fit on the jig in the correct orientation for drilling the side rung mortises.
Remember that the dimensions shown for this jig are for the example chair shown in the previous post, Angles, Part 1. The dimensions for your jig will be based on the actual size of the rungs and legs in your chair and will most likely differ from the dimensions shown above.
Related post: Angles, Part 1


